Many of us carry a small handgun as a second, or back-up gun (BUG), in addition to our larger, primary pistol. There are a number of solid reasons for this practice.
First, I teach all over the US, and everywhere I go I see good quality, well maintained handguns break during classes. By “break” I do not mean malfunction. I mean a part in the gun literally fails, putting the gun out of action. If it happens in classes, it may happen in a fight. If your primary gun becomes non-functional, a second gun could be a literal life saver. Second, you can give the back-up gun to a trained but unarmed companion. Third, in a struggle a BUG may be more accessible than your primary gun.
There are a number of ways to carry this secondary handgun, and over the years I have settled on ankle carry for mine. Here are my reasons for this decision.
Pocket carry just has too many limitations. It is damn near impossible to draw a gun from a pocket holster while seated, whether in a car or at a desk or table. We spend way too much time seated, especially in the car, for this carry mode. In a tangled hand to hand fight, pocket carry would be difficult to draw from. It is also very difficult to get a gun out of a right front pocket with the left hand, and vice versa.
Some people simply wear the back-up gun on the belt, on the support side, with the primary gun on the dominant hand side. My belt already has enough stuff on it, so I don’t care much for this mode, either.
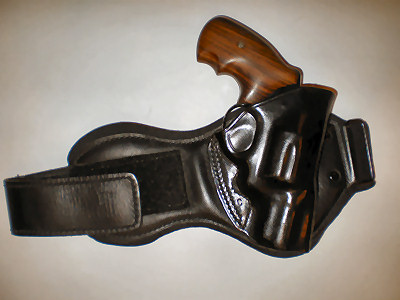
Carrying a handgun in a well designed ankle holster solves many of these issues. The ankle gun is actually quite easy to access while seated. While driving, a gun on the inside of the left ankle (right handed person) is quite easily accessed by the right hand. Even on my back on the ground, I can get to my ankle gun with either hand if necessary. A well made ankle rig is comfortable and discrete.
There are several very well designed and well made choices among ankle holsters. Over the years I have tried several, and have settled on some that are very comfortable, adequately secure, protect the pistol from the elements, and allow rapid acquisition. My favorites include the ankle holsters from Alessi, Ken Null, DeSantis, and Galco.
If I had to rank them in order of preference, the Alessi and Null rigs would be tied for first place. Both use Velcro fasteners to secure the holster to your lower calf. Both use precise molding to secure the handgun quite well, while allowing a very quick presentation. Both have a compressed felt backer on the holster, to protect your leg .
My next choice is the DeSantis rig. This is an elastic rig that closes with Velcro. In the revolver version, an ingenious bit of leather sits behind the trigger guard to keep the gun in place until you grasp it and pull firmly. This is a very comfortable and fast ankle set-up. The Galco version has a thumb-break security snap and very lightweight construction. Both the DeSantis and Galco holsters have a sheepskin pad behind the holster to cushion your leg.
Ankle carry works best with handguns that weigh around one pound, or very little more. The Airweight Smith & Wessons and the Colt Cobra or Agent are perfect for this role. Wear the thing for three or four weeks and you’ll hardly notice it is there from that point on. You may never need that back-up gun, but if you do, you’ll need it very badly.
“Dry firing” or “dry practice” consists of practicing firearms manipulations without the presence of any live ammunition. There are a couple of excellent reasons for engaging in this practice. For one thing, the rising cost of ammunition and the time burden of traveling to and from a live fire range often limits the amount of practice we can get. More practice equals more skill. Dry work can be accomplished in your own home and with no expenditure of ammunition, so there is zero cost.
Second, dry work is actually a better way to ingrain many skills. Without live fire, the shooter does not have the noise of a weapon’s discharge, the noise of other shooters’ guns firing, flying brass, reciprocating slides and the myriad other distractions on a typical firing range. Quiet, mentally focused dry work is an excellent way to learn the feel of your trigger, for instance, or to perfect your presentation from the holster.
Since you will be handling a real gun in your home there are certain precautions you will need to observe. Here is a checklist for you. Make a ritual out of going down this checklist every time, and before long these will be habits.
Dry practice should only be conducted in one designated, established area, and nowhere else in your home. That area should have a “safe wall”, that is a wall that will actually stop bullets in the event of an unintended discharge. A brick exterior wall or a stone fireplace can work, or you can use a body-armor vest as a back-stop. Do not dry fire toward an interior drywall.
When you enter the dry fire area, clear the gun and remove ALL live ammunition from the area. This includes loaded magazines or speedloaders, rounds in your pocket, or rounds in the desk drawer. Take all live ammunition to another room, then come back and clear your gun again.
You will need a target, which is simply an object to aim at while you dry fire. You can use an actual commercial target, a hand drawn reduced scale target, or something similar. Don’t use an expensive or important item or the house pet! Remember to place the target on the safe wall or body armor backstop.
A session of mentally focused practice should probably not last more than ten to fifteen minutes. If you try to stretch the session out, you will tend to get bored and sloppy. Sloppy practice is worse than no practice. Remember our goal is to rack up a huge number of correct repetitions over time, to build reflexive skills. “Muscle memory”, kinesthetic programming, conditioned reflexive responses, and habit all actually mean the same thing. All are born of consistent repetition.
If you get interrupted during the session by a phone call or other distraction, start all over again, back at step 1. Failure to do this is an invitation to disaster, unintentionally using a loaded gun for dry work.
There are two points in this process where there is actually a danger of an unintended discharge. Those two points are the very beginning and the very end of the session. Failure to clear the gun, move all ammo out of the room, and then clear the gun again can result in an unwanted discharge. The most common error seems to be finishing the session, loading the gun, and then saying, “Just one more rep.” When the session is over, say out loud to yourself, “This session is over. No more practice.” Leave the dry fire area for a while. Later, go back, load the gun and say out loud to yourself, “This gun is now loaded.” At that point, it can be safely put back in the holster, or wherever you keep it.
If you teach a large number of students like I do you will find a surprising percentage who are cross-dominant. No, that doesn’t mean they wear their spouse’s clothes to class. It means they are strongly dominant in one hand, but their dominant eye is on the other side of the body. An example would be a shooter who is right handed, but has a dominant left eye.
It is believed that 85-90% of the world’s population is right handed. However, about 2/3 of the population is right eye dominant, and 1/3 is left eye dominant. Only a small number, thought to be around 1% have no dominance in either eye. There are several simple tests an instructor can use to check for cross dominance issues. I’ll describe a couple of very easy ones here.
First, have the student make a small frame opening at arms’ length, by bringing the hands together. With both eyes open, have the student center a small object across the room in that opening. Close only the left eye, then open both. Close only the right eye, then open both. For one eye, the target object remained in the opening. For the other eye, the target object disappeared. The eye with which the object stayed in the frame is the dominant eye. An alternative method is to have the student center an object in the opening with both eyes open, then slowly bring the hands back to touch the face, keeping both eyes open. The opening will naturally be drawn toward the dominant eye.
On the range, the clue that the student is cross dominant is usually misses that impact the target a bit high but way off to the side. For a right handed/left eyed shooter, for instance, the hits will be high and to the left. Another clue can be discovered by watching the shooter while they fire. You may see the gun moving toward the shooter’s non-dominant side, or the head moving sideways as the shooter aims. If you see these clues, it’s time to perform the eye dominance tests described above.
With a shoulder fired weapon, such as a rifle or shotgun, really the only satisfactory solution is to learn to shoot from the shoulder on the same side as the dominant eye. I am not aware of any other practical fix for this with long guns.
With handguns, we have some options. One controversial method is to simply learn to shoot with the hand on the same side as the dominant eye. So, if you are left eye dominant, you hold the handgun in the left hand, which puts the sights right in front of the dominant eye. Bill Rogers is probably the best known proponent of this system.
Another method is to keep the gun in the dominant hand, but move the head to bring the dominant eye behind the sights. This can be done two ways. We’ll use the example of a right handed/left eyed shooter, for clarity. In the first method, the head is rotated on its vertical axis to bring the left eye behind the sights. This is sub-optimal, as it points the right eye off to the right side, reducing peripheral vision to the front left. It appears to work better to keep the head pointed forward, but tilt it to the right just enough to bring the left eye behind the sights. You have probably seen pictures of Jeff Cooper shooting a 1911 in a classic Weaver stance. You may have noticed his head cocked over to the right. This was because Jeff was right handed but left eye dominant, and used this technique.
A third option is to cant the pistol inboard from 15-40 degrees to bring the sights into the focal plane of the left eye. I am not a fan of this particular method.
Now that you know what to look for, I predict you will notice more cross dominant students. Now, you know how to help them.
For many years Colt was the world’s preeminent manufacturer of handguns. In the early days of the 20th century, until after WWII, Colt was the main supplier of handguns to the US military, federal and local law enforcement agencies, and private citizens around the world. In response to demand for a more concealable handgun, in 1927 Colt introduced the Detective Special, which was an instant success. Weighing just 23 ounces, holding 6 rounds of .38 Special ammo, in a sturdy but compact package, the gun was soon in great demand.
After World War II Colt and Smith & Wesson began experimenting with aluminum frames to reduce the weight of handguns, which up to that time had been of all steel construction. In 1950, Colt produced an aluminum frame version of the Detective Special, dubbing it the Cobra, and a new era for snubbies began.
Although externally identical to the Detective Special, the Cobra dropped the weight from 23 ounces to just 15 ounces. Frankly, worn on a gun belt the difference is hardly noticeable, but in the pocket or on the ankle, the difference is immediately apparent. The first generation Cobra’s made in the early 1950’s had a full length grip frame, which extended all the way to the bottom of the wooden stocks. The front sight was narrow, and the rear sight notch was quite small. The ejector rod was short—too short to forcefully extract empty cases for a fast reload. All of these shortcomings were addressed in the mid-1950’s when the second generation guns appeared. The front sight was made significantly larger, just like the ones on the Official Police service revolver of that day. The ejector rod was lengthened, to improve extraction of fired cases. In 1966, the final improvement was made, when the grip frame was shortened substantially. This allows very compact grips of various designs to be fitted to suit the user’s particular needs.
In 1973 the D-frame line, which included the Colt Detective Special, the Cobra, and the Agent were redesigned to “modernize” them. These last third generation guns have a heavier barrel, with a shrouded ejector rod, and tiny, hard to see low ramped sights. To me, they are far less desirable than the second generation guns, with their high visibility sights. My recommendation of the Colt Cobra as the premiere back-up gun assumes a second generation gun, which are easy to find and reasonably priced. The second generation guns were made from the mid-1950’s to 1973, and several hundred thousand were manufactured, so they are not hard to find.
Why, you ask, would I hunt up these antique revolvers instead of just buying a new one from some other maker? Good question, and I have some good answers. First, the old Colt holds 6 rounds, not 5. In essentially the same size package, more ammo is better. More importantly, the Colt’s have sights I can see. A front sight big enough to pick up quickly is the single greatest aid to high speed accuracy. If you only have 5-6 medium caliber rounds to fire, you’d better be getting hits with every one of them. That’s a lot easier with the Colts. The old-timers often preferred the Colts over S&W’s because on the Colt the cylinder rotates to the right, and the hand pushes the cylinder to the right (into the frame) to lock up just before a cartridge is fired. Theoretically, this gives a tighter, stronger lock-up to the Colt over a Smith & Wesson, which rotates counter-clockwise and is pushed away from the frame at lock-up. I doubt that this is a big deal, but I have noticed that my Colt’s shoot very well for small revolvers. Finally, the 1950’s and 1960’s production guns featured very good fit and finish. The old Colt revolver action required a bit of hand fitting at the factory, which made it more expensive than some of its competitors. They are often much better made than current production guns.
Look up one of these second generation Colts and get acquainted with it. I think you’ll be pleased.
Have you ever been accosted by a clay disc? Has a deer or pheasant ever fired back at you? Can you imagine being robbed from 500 yards away? Marksmen likely would resort to similar fundamentals in each of those different applications, but marksmanship is just the tip of the iceberg when it comes to personal protection. Sporting, hunting, and sniping all have distinct appeals and utilities. However, if your goal is practical self-defense, then your training must be grounded in that very unique context. With these distinctions in mind, the SAFTEA has been hard at work developing a new Training Division, which officially launches nationwide in January of 2015.
SAFTEA has assembled some of the most experienced defensive trainers in the country to create a curriculum that is laser-focused on modern personal defense. Their instruction has nothing to do with politics, profits, or popular “tacti-cool” maneuvers and gadgetry. Instead, every course is geared towards a single goal: equipping everyday folks with effective tools to survive the kinds of hostile encounters they can realistically expect to face in today’s world.
Throughout my teenage years, firearms were a mystery to me. So, too, was violence — let alone the thought of having any power to repel it. Self-defense meant simply calling the police. Only through tragedy did I realize that personal safety is very personal indeed. My welfare is no one’s responsibility but my own. And although it was a painful lesson to learn, I am forever grateful that a group of trainers welcomed me and took the time to demystify the concept of deadly force as a last resort.
A few short years later, I became a firearms instructor myself, eager to empower others with the knowledge that my trainers had instilled in me. Many of those trainers are now at the helm of the SAFTEA. So when the opportunity arose for me to be a part of that team, I did not hesitate. I applaud the Training Division’s effort to ensure that the Second Amendment continues to enrich and secure all American walks of life.
Of course, there’s absolutely nothing wrong with trapshooting — or any other pastime that encourages discipline, patience, and precision. But when you need a knife, you don’t grab a spoon. And if you hope to be mentally, physically, and technically prepared to fend off a red-blooded rival, plinking at tin cans in the back yard will not suffice. Instead, contact SAFTEA. Sign up for a class. Look for opportunities to learn and to teach. Whether you’re a newcomer or a Navy SEAL, we look forward to training with you.
The Second Amendment Foundation is pleased to announce the official launch of the Second Amendment Foundation Training Division (SAFTD), enabling law abiding citizens to protect themselves and their loved ones through solid defensive training.
FOR IMMEDIATE RELEASE
Contact Bob Boilard 603-566-1727 or This email address is being protected from spambots. You need JavaScript enabled to view it.
Bellevue, WA – January 7th 2015 –It has long been noted that the firearms training community has lacked a nationwide training program specifically directed at training the new and inexperienced shooter in the defensive use of the most common platforms of firearms – pistol, shotgun and carbine. Over the past year the Second Amendment Foundation Training Division – SAFTD (www.saftd.org) – has embarked on the development of just such a training program.
Beginning in early 2014 experienced trainers from throughout the country were recruited to act as the core of SAFTD and to begin the development of a number of foundational courses. The initial offerings include MOI – Methods of Instruction, Defensive Handgun 1, Defensive Handgun 2, Defensive Shotgun 1, Defensive Shotgun 2, Defensive Carbine 1 and Defensive Carbine 2 in addition to instructor level course work to train a national cadre of firearms instructors to offer SAFTD courses throughout the nation.
All of the courses offered are presented with the defensive use of the individual firearm in mind. While familiar foundational material is presented, additional defensive topics and activities are included such as firearm selection, holsters, use of force, discussions about AOJP – Ability, Opportunity, Jeopardy, Preclusion – Disparity of Force and much more. All Level 1 courses are introductory and foundational. All Level 2 courses take the student’s foundational skill set and builds it into a more comprehensive defensive shooting level.
These courses will be the introductory set rolled out through the Spring and early Summer of 2015. The national introduction of the SAFTD courses will be held at the Shot Show in Las Vegas in late January. Initial instructors will be trained beginning in February. Initial student level coursework will begin mid-March. All coursework will be scheduled via SAFTD’s website with all available courses and regional trainers being listed along with full course descriptions and full bios of all certified SAFTD instructors.
Instructors will need to attend SAFTD’s MOI course – as well as completing periodic Continuing Education, the course they wish to be certified to teach and the instructor version of that course while achieving passing scores of 90% on all written exams. At the end of the instructor course, they will shoot a qualification course requiring a passing score of 90%. Instructors must also have a First Aid certification from a recognized organization as well as having certified instruction in CPR and the use of an AED.
In addition to the core offerings SAFTD will also be offering a Situational Alertness for Everyone (S.A.F.E.) course which is designed to teach the student to develop and adopt the situational awareness mindset while at home, at work, on the road, traveling, on the phone etc; and teaches how to make your home safe and less attractive to would be robbers and home invasion.
Lastly, SAFTD will also be offering a Women’s Program. The SAFTD Women's program was developed by women for women and addresses the specials needs of women, their firearms, security and special concerns with carrying a firearm both on and off-body. Initially our Women's program will consist of Women's Defensive Handgun 1 and 2 but will eventually lead to a full women's program starting in early 2016 including State Chapters and State Leaders for each state.
We are excited about our program. We strongly believe it fills a significant gap in what is being offered to a new defensive firearms student. We look forward to meeting you all at Shot Show and in the weeks, months and years to come.
About SAF Training Division:
The mission of the SAF Training Division (SAFTD) is to fill a long standing void in the national training community, by producing a program that is based on enabling law abiding citizens to protect themselves and their loved ones through solid defensive training! Our primary responsibility is to the student and our primary allegiance is to our instructors! We know that we need to support our instructors and their respective businesses, their livelihoods depend on it! By supporting our instructors and providing them with different revenue streams and a responsive organization, we enable our instructors to give a first class experience to the public!
When you seek training in the use of your firearms – what type of training should you search out? There is a simple answer – it depends on its use. If you are looking to know how to handle a firearm safely, shoot it safely and the basics of marksmanship, there are a number of different courses available that teach just that – and nothing more.
However, if you are looking for coursework that will teach you to defend yourself should that need arise – then you are looking specifically for “Defensive Firearms Training” (D.F.T.).
A solid D.F.T. program will provide you with the fundamentals – information about the specific firearm, its cycle of operation, methods to clear malfunctions, choosing the right ammunition, how to load it, proper grip, sight alignment, sight picture, your shooting stance, proper trigger press and follow through. Past that, there is much more depth needed. People who carry a defensive weapon need training on proper belts, holsters, concealment garments, ideas for off-body carry – all the way to how to properly conduct yourself in a restroom with your defensive weapon.
Those who carry a defensive weapon also need to receive training on how to observe what is going on around them and how to select cover and use concealment. They need some standard methods to deescalate a potentially bad situation. And they need to know how to clearly articulate why the individual they engaged with their defensive weapon had the Ability to hurt them, had the Opportunity to hurt them, why they felt they were in imminent Jeopardy and that they were left with the use of their defensive weapon to the Preclusion of any other option.
Once the decision has been made to use their defensive weapon, they must receive training that gives them the ability to rapidly and accurately use their weapon. The defender “owns every round” – they need to insure they go exactly where they need to do.
These are the characteristics that separate familiarization courses, shooting sports courses, basic introduction courses from true Defensive Firearms Training. Know the differences, seek out the specific type of training you are looking for and, if you carry a defensive weapon, make sure the training is tailored to that specific need.
The SAFTEA is releasing just such a body of coursework covering Defensive Handgun, Defensive Shotgun and Defensive Carbine. Give them a look at http://saftea.org
The SAFTEA Instructor level courses are designed to teach the experienced shooter/instructor, how to present the SAFTEA courses to the general public using the SAFTEA MOI as a basis for instructional methods and techniques. This course also encompasses the proper running of the range portions of the class and the best practices for achieving the maximum amount of learning from the students.
The goal of the SAFTEA’s Defensive Shotgun 2 Course is to provide the student with an opportunity to build upon the foundational skill-set and knowledge base that was acquired in Defensive Shotgun 1. This will include a continued focus on the defensive mindset, discussion regarding avoidance/deescalation strategies, an understanding of the physiological changes that occur in the human body when under lethal force stress and what affect they have on our training, and a series of skill development exercises that will help the student learn to more efficiently and effectively use a shotgun for self defense in a lethal force encounter.
Defensive Shotgun 2 is not a “marksmanship” or “target shooting” course. Rather it is designed to help the student quickly develop essential skills that can help him/her prevail in a real lethal force encounter.
Defensive Shotgun 2 consists of a full day of intense range training and instruction covering a variety of topics including, but not limited to:
Avoidance and deescalation strategies
The importance of the Defensive Mindset
Physiological changes that occur when under severe stress
Review of Defensive Shooting Fundamentals
Defensive Accuracy Concept
Volume of Fire
Using lateral movement
Presentation of the Shotgun
Emergency and Tactical Reloads
Proper Scan and Assess procedure
Malfunction Clearing Remedies
Engaging Multiple Targets
Moving to Cover and/or Concealment
Application of learned skills under realistic conditions
Required Gear:
A modern, serviceable shotgun, (pump or semi-auto shotgun recommended) in 12, 16 or 20 gauge
Eye and ear protection (safety glasses that meet ANSI Z87.1-2003 standards, and ear plugs or muffs with at least 21db Noise Reduction Rating).
Sturdy Shoes, Long Pants, Shirt With Higher Collar
Ammunition: Factory fresh ammo only. NO RELOADS or specialty ammo.
150 rounds (7 1/2 or #8 shot), 25 shells that are #5 shot and at least 10 00-buck
A quality belt designed to anchor gear to your body
Shotshell carrier (either weapon mounted, belt or shotshell pouch)
Comfortable clothing, knee-pads (optional but recommended).
Hydration system or Bottled water.
Baseball Cap
The Defensive Shotgun 2 course length is a full day, typically taking 8 – 10 hours including a 1-hour scheduled lunch break. A short break is given after each hour of instruction (approximately).

 Many of us carry a small handgun as a second, or back-up gun (BUG), in addition to our larger, primary pistol. There are a number of solid reasons for this practice.
 “Dry firing” or “dry practice” consists of practicing firearms manipulations without the presence of any live ammunition. There are a couple of excellent reasons for engaging in this practice. For one thing, the rising cost of ammunition and the time burden of traveling to and from a live fire range often limits the amount of practice we can get. More practice equals more skill. Dry work can be accomplished in your own home and with no expenditure of ammunition, so there is zero cost.
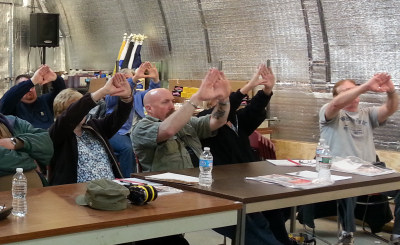 If you teach a large number of students like I do you will find a surprising percentage who are cross-dominant. No, that doesn’t mean they wear their spouse’s clothes to class. It means they are strongly dominant in one hand, but their dominant eye is on the other side of the body. An example would be a shooter who is right handed, but has a dominant left eye.
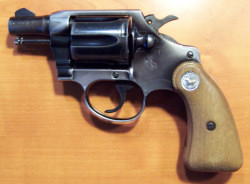 For many years Colt was the world’s preeminent manufacturer of handguns. In the early days of the 20th century, until after WWII, Colt was the main supplier of handguns to the US military, federal and local law enforcement agencies, and private citizens around the world. In response to demand for a more concealable handgun, in 1927 Colt introduced the Detective Special, which was an instant success. Weighing just 23 ounces, holding 6 rounds of .38 Special ammo, in a sturdy but compact package, the gun was soon in great demand.
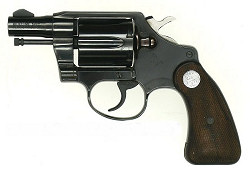 In 1973 the D-frame line, which included the Colt Detective Special, the Cobra, and the Agent were redesigned to “modernize” them. These last third generation guns have a heavier barrel, with a shrouded ejector rod, and tiny, hard to see low ramped sights. To me, they are far less desirable than the second generation guns, with their high visibility sights. My recommendation of the Colt Cobra as the premiere back-up gun assumes a second generation gun, which are easy to find and reasonably priced. The second generation guns were made from the mid-1950’s to 1973, and several hundred thousand were manufactured, so they are not hard to find.
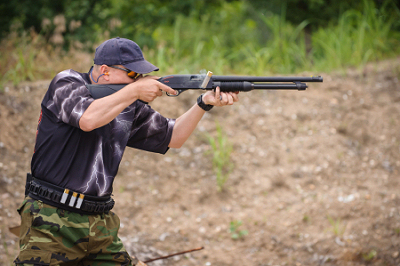 Beginning in early 2014 experienced trainers from throughout the country were recruited to act as the core of SAFTD and to begin the development of a number of foundational courses. The initial offerings include MOI – Methods of Instruction, Defensive Handgun 1, Defensive Handgun 2, Defensive Shotgun 1, Defensive Shotgun 2, Defensive Carbine 1 and Defensive Carbine 2 in addition to instructor level course work to train a national cadre of firearms instructors to offer SAFTD courses throughout the nation.